|
|||
|
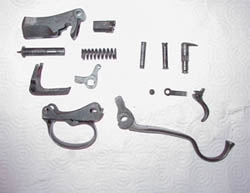
Black powder fouling, dirt, grime, dust and other harmful contaminants can get into your Martini's action and cause premature wear, corrosion and even severe mechanical problems. As a result, it is occasionally necessary to pull the guts out of your Martini's action body to clean and lubricate the bits that make the Martini magic happen. Cleaning and proper lubrication will keep your Martini in good working order, it will also enable you to view some of your Martini's more obscure markings. Stripping and reassembling a Martini can be a daunting task if you've never done this before. Using the following steps as a guide will help you through your first time stripping your Martini. Now, a little disclaimer: the information provided here is solely for the purpose of general knowledge. It is not intended as an instructional course in gunsmithing. Therefore, I am not responsible for any damages occurring as a result of these instructions. |

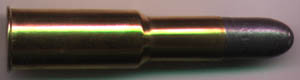
Okay, safety first. Step one
is to ensure there isn't one of these in the chamber. Once
the weapon has been verified clear, choose a nice big, flat
work surface such as a table or workbench, and lay down old
towels, sheets or other soft material you don't mind getting
greasy. The idea is to be able to move the Martini around
without acquiring more dents, dings, nicks or
scratches. Place the Martini on its
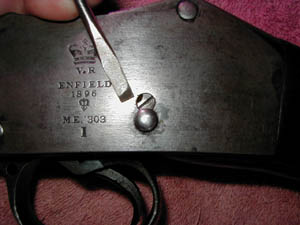
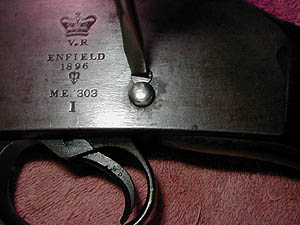
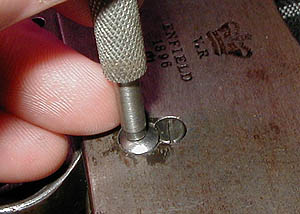
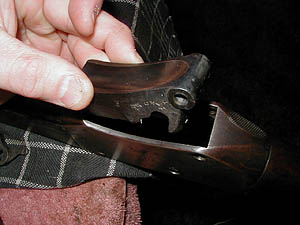
right side, with the cocking indicator down. Find the
Lever/Tumbler Axis Pin Keeper Screw indicated by the
screwdriver tip in the photo at left. This screw is what
holds the Lever/Tumbler Axis Pin in the action body. This
screw has one, and sometimes two half-moon shaped cuts in
its head. The purpose of the moon shaped cut is to enable
the screw to be turned so the Lever/Tumbler Axis Pin (a.k.a.
Cocking Indicator) can slide out. You'll notice in this
photo that the screw is currently positioned to engage the
small channel in the end of the Lever/Tumbler Axis
Pin. Using a regular screwdriver
with the correct thickness, (usually between .6 and
.8mm, depending on how buggered the screw slot is) rotate
the keeper screw anti-clockwise until a half-moon aligns
with the Lever/Tumbler Axis Pin as indicated here. It is
very common to see these keeper screws buggered beyond use.
Although it isn't necessary to completely remove this screw
once the pin is out, you may want to do so to clean beneath
it. I always do this with newly acquired Martinis. I clean
the threads in the action body with a small pipe cleaner and
a good solvent. Once the keeper screw is
correctly aligned, hang the Martini off the edge of the work
surface and gently tap the Lever/Tumbler Axis Pin through
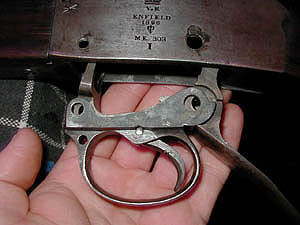
the action body with a punch and rubber mallet. Next, flip the Martini over
and remove the Extractor/Trigger Guard Retaining Screw using
a properly fitting regular screwdriver. Be sure to clean the
threads and head slot of this screw with a wire brush before
reassembling, as they are typically very dirty. With the Extractor/Trigger
Guard Retaining Screw and the Lever/Tumbler Axis Pin
removed, gently rock the trigger guard assembly out of the
action body. The operating lever, tumbler and extractor will
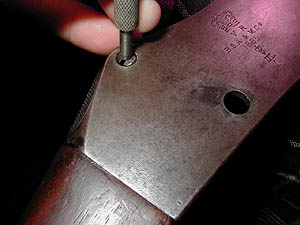
come out with it. The next step is to punch
out the Breechblock Axis Pin. This is the only device
holding in the entire breechblock assembly. Please note that
this is simply a split pin, and it is not threaded.
You could twizzle this thing all day, and it wouldn't move
in or out an inch. The trick here is to punch the split end
of the pin, and the whole pin will slide out. Last but not least, pull the
breechblock out of the action body. Notice the rounded
portion of the block that the pin passes through. To remove
the block, you'll need to lower the front portion of the
block, disengage the rounded portion from it's shelf, and
then slide the block out rear first. You can vary the order of
certain steps in the take-apart. Some people like to remove
the breechblock first...it's really a matter of preference.
Once you do it a few times, you'll develop your own habits.
![]()
Martini Home | The Boxer-Henry Cartridge | Carbines | Infantry Rifles | Zulu War | Links | Bayonets | Markings | FAQ
Questions, comments, something to contribute? Contact me, Jason Atkin, at the address below...
jmatkin@martinihenry.com
Last Modified: 02/11/05